
How to use Easing Curves Easing Graphs in Alight Motion
Published By Admin
Alight Motion provides easing curves or graphs to control the acceleration and deceleration of animations. Easing curves allow you to create smooth and natural-looking motion by adjusting the speed of an animation over time. I will review all the easing types in alight motion and describe some everyday use cases.
Here’s how to use Animation easing curves:
- Open the Easing Curve Editor:
- Pick the layer or keyframe you want to work on.
- Look for “Easing” or “Curve” in the editing menu.
- Choose an Easing Curve:
- Tap on the Easing option to see different curves.
- Some standard curves are linear, ease-in, ease-out, and ease-in-out. You can also make a custom curve.
- Adjust the Curve:
- If you can customize the curve, you’ll see handles you can move.
- Move them to shape the curve the way you want. Pulling a handle up might make it slow down, and pulling it down might speed up.
- Preview the Animation:
- Watch your animation with the new easing curve to see how it changes.
- Adjust the curve until it looks the way you want.
- Fine-Tune Timing:
- Some apps let you adjust when the speed-up or slow-down happens.
- Copy and Paste Easing:
- You can copy and paste easing settings between different animation parts in some apps. This saves time and makes your animation consistent.
- Experiment and Learn:
- Easing curves might seem tricky, so try different ones to see how they affect your animation.
- Learning about easing curves helps you make excellent and professional animations.”
The ease property allows us to control how layer properties animate between keyframes and Tweening. There are several different types of easing, each with various uses. It can used to manage the speed and acceleration of animations between keyframes. They allow you to fine-tune the movement and create more realistic and polished animations.
By adjusting the handles on the easing graph, you can control how quickly or slowly an animation starts, stops, or changes direction. This gives you more control over the timing and smoothness of your animations. Each pair of keyframes is determined by the animation’s ease.
For this reason, you must have at least two keyframes for the layer’s property to access the easing option.
What is Easing in Alight Motion?
Easing in the context of animation, including in Alight Motion, refers to the gradual acceleration or deceleration of an animated object’s movement. It helps make the motion look more natural and less robotic by adding a sense of inertia and flow.
In Alight Motion, easing is typically applied to keyframes. Keyframes are specific points in time where you set the properties of an object (such as position, scale, or rotation) to create animation. Easing allows you to control the speed of the transition between keyframes.
There are different kinds of easing, and each one makes the animation a bit different:
- Linear Easing: The animation moves at the same speed all the time between keyframes.
- Ease In: The animation starts slow and then speeds up.
- Ease Out: The animation starts fast and then slows down.
- Ease In-Out: It’s a mix of starting slow, getting fast in the middle, and then slowing down again at the end.
- Custom Easing: In Alight Motion, you can make your easing curves. This means you have more control over how fast things change in your animation.

By adjusting the easing for your keyframes, you can fine-tune the way objects move in your animations, creating more visually appealing and realistic results.
Let’s start with How Easing Curves Work in alight motion
1. Start a new project in Alight Motion.
2. Create or import the layers or objects you want to animate.
3. Select the object or layer that you wish to animate.
4. Find the element (such as location, scale, or rotation) you want to animate in the “Properties” window.
5. Select the property by clicking on the stopwatch symbol. At this point, a keyframe is created.
6. To make the property change, move the play head to a different point in the timeline.
7. At that point, change the property to the desired value.
8. this program will automatically generate a new keyframe at that point.
9. To modify the easing curve, Use the “Edit Easing Curve” menu item when you right-click on a keyframe.”
Right-click on a keyframe to adjust the easing curve and choose “Edit Easing Curve.”
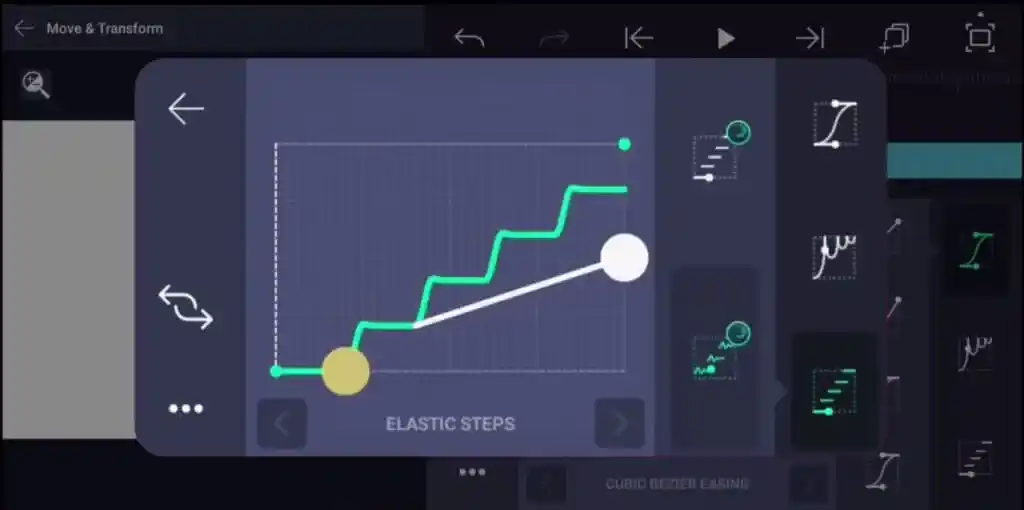
10. In the Easing Curve editor, you can drag the handles to adjust the curve or choose from the preset easing options.
11. Preview your animation to see how the easing affects the movement between keyframes.
12. Repeat the process for other properties or layers to create a more complex animation.
Experimenting with different easing curves can help you achieve the desired animation effect.
How to use Animation Easing in Alight Motion
Alight Motion makes it easy for you to control how your animations speed up and slow down. Keep in mind that the app might have received updates, so the steps could be a bit different. Here’s a general guide on how to use animation easing in Alight Motion:
- Launch Your Project:
- Fire up the Alight Motion app and open the project you’re currently working on.
- Pick Your Layer or Keyframe:
- Identify the specific layer or keyframe that you want to tweak.

- Dive into Easing Options:
- Head to the chosen layer or keyframe settings and spot the “Easing” option. The magic happens here, allowing you to tailor how your animation flows.

- Select an Easing Curve:
- Alight Motion offers ready-to-go easing curves like linear, ease-in, ease-out, and ease-in-out. Choose the one that vibes with your animation style.
- Are you feeling adventurous? Some apps even let you craft a unique easing curve by tweaking it manually.

- Fine-Tune Easing Intensity:
- Explore the app’s features to fine-tune the strength or intensity of the easing effect. This control lets you dictate whether your animation speeds up or slows down in a flash or takes a stroll.
- Preview Your Animated Creation:
- Play your animation after applying the easing curve to witness the transformation. This visual check helps you decide if further adjustments are needed for that perfect flow.

- Copy and Paste Easing Magic (if available):
- Alight Motion and its kin allow you to copy and paste, easing settings between keyframes or layers. This is a nifty trick for maintaining a consistent and mesmerizing easing pattern in your animation.
- Embark on an Experimentation Journey:
- The feel of your animation is greatly influenced by easing curves. Dive into the world of experimentation, trying out different relaxing options to observe how they affect the timing and flow of your motion. This hands-on approach is your ticket to understanding and mastering animation easing in Alight Motion!


 10")


Leave a Reply